Steel covers a vast fraction of the selected materials for the engineering applications since it promises superior toughness and strength properties. Hence, industrial applications prefer to utilize steel from simple works to complex operations. Therefore, the shaping of the steel components is vital for these operations. Steel production facilities can only produce raw materials that are in simple geometries. Further shaping of the steel can be maintained in local workshops by using specific operations. One of the most preferred methods for shaping and joining steel components to each other is welding. Welding operations offer high strength joints with various shapes. However, the implantation of the welding process affects the final quality of the welded parts in the manner of both strength and toughness. Moreover, welding operations have various subgroups which differ from each other. Optimum parameters for welding types must be ensured before the initiation of the process.
To start with, one must well understand the basics of welding for better clarification of further problems. The welding method can be separated into two groups which are; fusion welding and solid-state welding. The fusion welding process covers the most common welding operations where a filler metal or parent metal itself melts. In contrast with that, solid-state welding methods cover the operations where the melting of the parent metal does not occur or only a small part of the parent metal melts. In brief, fusion welding methods progress at temperatures that are higher when compared with the solid-state welding temperatures. Most applications utilize fusion welding methods because of their simplicity. Hence, a moderate knowledge of fusion welding defects may be advantageous for individuals who are eager for developing welding skills.
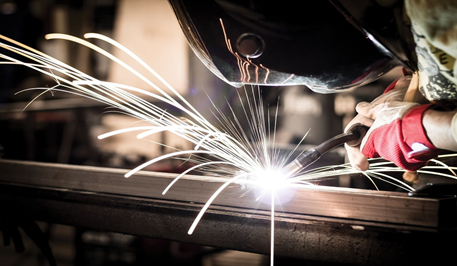
Figure 1: Fusion welding operation. Martin, C. (2020). CSA updates fusion welding certification. Retrieved 18 September 2020, from https://www.canadianmetalworking.com/canadianfabricatingandwelding/blog/welding/csa-updates-fusion-welding-certification
Fusion welding applications result in the melting of the parent metals where the contact of parts is ensured. Joining of the parent metals is provided by the local melting, so melting metal must be selected similar to the parts that will be welded. A considerable fraction of fusion welding applications comprises the utilization of a filler metal that has a similar composition with the parental metal. Moreover, microstructural properties of the weld pool (melted area) are also crucial since the mechanical properties of the welded metals are directly affected by the microstructure of the weld pool. However, a fully melted weld pool solidifies as cast metal, so the microstructure of the weld pool develops as the microstructure of cast metal. Nucleation of the melt starts from the coolest regions, which are the neighboring zones between the weld pool and solid parent metal (contact point or boundary of the melted region and solid region). Since the heat gradient strongly affects the nucleation of the liquid metal, columnar grains occur as the solidification proceeds. Generally, the columnar microstructure of the weld pool does not affect the mechanical properties of the welded components. At that point, the solidification of the weld pool shows similarities with the solidification of a cast structure.
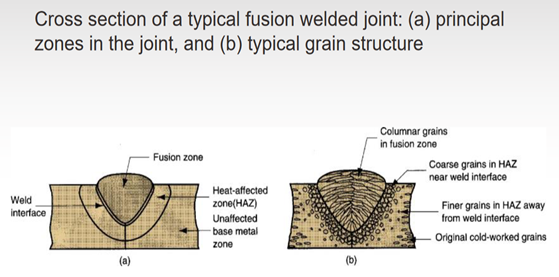
Figure 2: Columnar grains of weld pool (fusion zone). (2020). Retrieved 18 September 2020, from https://physics.stackexchange.com/questions/519413/question-about-metal-grain-formation-in-fusion-welded-joint
When the fusion zone melts and solidifies, the neighboring zones are also affected by the heat generated to melt the weld pool. Hence, from a metallurgical point of view, examining these adjacent zones is vital since microstructural changes can be observed in these regions. In most of the applications, steel structures are heat-treated to obtain better mechanical properties. Heat treatment of the steel components creates microstructural variations in the steel body, and these microstructural changes generally become beneficial for further applications. Heat treatment of the steel components comprises three steps which are; heating, soaking, and cooling. When the steel structure is heated at a certain point, the microstructure of the steel comprises only the austenite phase. The cooling rate of the austenite phase determines the final microstructure of the steel itself. Hence, neighboring zones which are near to the fusion area act as heat treated metals, and that’s why these regions are called heat-affected zones (HAZ).
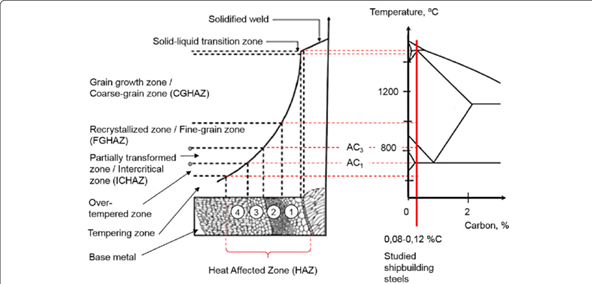
Figure 3: Heat affected zone and iron-iron carbide phase diagram relationship. Retrieved from: Layus, P., Kah, P., Khlusova, E., & Orlov, V. (2018). Study of the sensitivity of high-strength cold-resistant shipbuilding steels to thermal cycle of arc welding. International Journal of Mechanical and Materials Engineering, 13(1). doi:10.1186/s40712-018-0090-1
Heat affected zone of the welded steel carries considerable importance since the structural changes on the heat-affected area may directly affect the mechanical properties of the parent steel or metal. An essential consideration of the heat-affected zone can be done by using the TTT diagrams. Rapid cooling of the related steel may result in the formation of martensite structure in the body. Hence, the brittle martensitic structure increases the hardness of the steel but also decreases the toughness and ductility of the steel. For optimum properties, the formation of the martensitic structure in the heat-affected zone must be hindered. Moreover, if martensitic transformation occurs in the heat-affected zone, this may lead to the emergence of cracks and distortions in the steel body. One of the most important reasons for the distortions in the body is the diffusionless transformation of the austenite to the martensite. When rapid cooling is ensured, the austenitic heat affected zone may transform into a martensitic structure without any carbon diffusion. This diffusionless transformation of the martensite creates torsional forces in the steel body just because of the variation of the crystal structure of austenite (face-centered cubic, FCC) and martensite (body-centered tetragonal, BCT). Transformation occurs when two austenitic structures align and form BCT martensite. When transformation ends, lattice distortion occurs in the BCT structure, and also volume expansion is observed. One of the most significant reasons for the superior hardness of martensite can be explained via ensuring a good understanding of the lattice distortion. However, the diffusionless transformation of martensite is risky for the welded steel since volume expansion of martensite may lead to crackings in the neighboring zones.
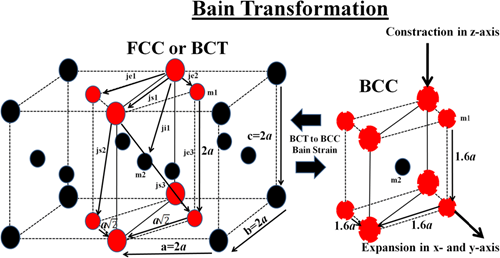
Figure 4: FCC to BCT transformation or martensitic transformation. Retrieved from: Şarlı, N., Dağdemir, Y., & Saatçi, B. (2019). Small Thermal Magnetization Loop Revealed by Bain Strain. Journal of Superconductivity and Novel Magnetism. doi:10.1007/s10948-019-05181-x
During the welding of steel, the formation of martensite in the heat-affected zone must be hindered. The composition of the steel and cooling rate of the heat-affected zone is vital when the prevention of martensite formation is aimed. The critical curves in the TTT diagrams may shifts through the right hand side or left-hand side, depending on the amount of alloying elements and carbon ratio. Briefly, most of the alloying elements shift CC curves to the left of the diagram, which also means a decrement in the critical cooling rate. In addition to that, the increase in carbon amount in the steel also decreases the critical cooling rate. Hence both alloying elements and a higher amount of carbon in steel composition eases the formation of martensite. The cooling rate of the steel may be controlled for specific compositions; however, control of the cooling rate cannot prevent the martensitic transformation of high carbon high alloy steels. The effects of both carbon amount and alloying elements can be determined by calculating the carbon equivalent of the steel composition. The below formula is commonly used for the calculation of carbon equivalent;
C.E= %C+ (%Mn)/6+(%Cr+%Mo+%V)/6+(%Cu+%Ni)/15
The determined carbon equivalent amount is used to prevent the martensite formation in welding operations. One option to inhibit the martensite formation is the preheating method, which lowers the cooling rate of the welded steel. In the preheating process, parent metal is heated up to a specific temperature before the initiation of the welding operation. The cooling rate of the heated steel is lowered down because of the preheating, and possible martensitic formation is prevented. The need for preheating can be determined by considering the carbon equivalent values. For certain intervals, the degree and amount of preheating are decided. The below table shows a general approach for the required amount of preheating.
Table 1.
| Carbon Equivalent | Preheating Temperature |
| 0 – 0.3 | Optional Preheating |
| 0.3 -0.45 | Preheat 93 C to 205 C |
| Above 0.45 | Preheat 204 C to 371 C |
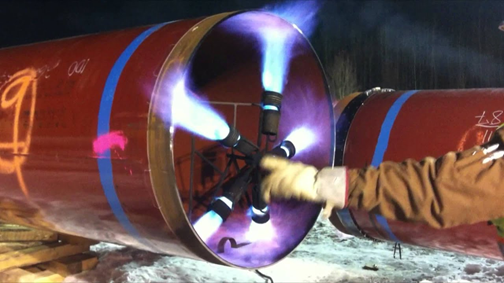
Figure 5: Preheating of pipes prevent distortions and cracks before welding. Preheating also provides some specific mechanical properties, such as toughness. When Preheating Before Welding, How to Choose the Right Equipment. (2020). Retrieved 25 September 2020, from https://www.millerwelds.com/resources/article-library/when-preheating-before-welding-how-to-choose-the-right-equipment
In some cases, when the amount of alloying elements and carbon is exceptionally high, the implementation only preheating cannot prevent the martensitic transformation. Hence, post-weld heat treatment is ensured to maintain prevention. Furthermore, post-weld heating reduces the residual stresses of the welded steel (or metal) and removes diffusible hydrogen from the surface.
Welding of stainless steel contains further risks when compared with the welding of carbon steels. One of the most popular risk during welding of stainless steels is the formation of intergranular corrosion or weld decay. All stainless steel grades contain at least %12 chromium in their composition to yield a passivity against corrosion. Austenitic stainless steel grades are commonly used in many industrial applications. However, intergranular corrosion risks are high for 304 grades, especially for the ones that have thick cross-sections. When welding is implemented, sensitization may occur, and chromium carbide precipitates forms on the grain boundaries. When chromium carbide formation occurs, carbon atoms combine with the chromium atoms that are near to the grain boundaries. This may lead to lack of chromium at the neighboring regions that are close to grain boundaries. The chromium depleted zones are became unprotected against corrosion possibility since the insufficient amount of chromium cannot ensure passivity at depleted zones. The cooling rate is extremely important when dealing with the weld decays. Greater cooling rates at heat affected zones prevent the formation of chromium carbide. In contrast with that, slow cooling of the heat-affected zone creates sensitization and causes carbide formation at grain boundaries. The sensitization time depends on the carbon amount of steel, and proper determination of the sensitization time must be ensured before the welding operations.
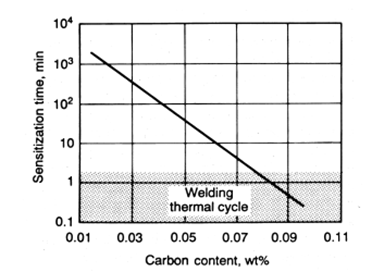
Figure 6: Minimum sensitization time and carbon ratio relationship. Retrieved from: Davis, J. (2006). Corrosion of weldments. Materials Park, OH: ASM International.
The importance of intergranular corrosion is obvious, so the protection methods from this corrosion type are numerous. Post-weld heating or annealing and quenching can be implemented to the welded stainless to inhibit the formation of chromium carbide at the grain boundaries. Moreover, lower carbon grades can be selected for welding operations. Common 304 grade austenitic stainless steel can be replaced with 304L grade to decrease the carbon amount in the composition. Another option to avoid the sensitization is utilizing a high-chromium alloy in the welding operations, such as 310 grade. Some elements are higher carbon affinity than chromium and can be used to prevent intergranular corrosion. Titanium and niobium are the most popular ones that are used in welding operations. When titanium or niobium alloyed steels are used in welding, carbide formation is ensured with the combination of carbon and titanium or niobium since Ti and Nb have higher carbon affinity than chromium. This prevents the formation of chromium depleted zones and hinders the sensitization. Hence 321 or 347 grade alloys can be used for the welding operations.
Cold cracks in the welded body are significantly crucial for the progress of the operations since micro or macro cracks act as stress concentration points and lead to failure of the body. Hydrogen embrittlement is commonly observed during welding operations. When the welding surface is not clean enough, hydrocarbons decompose into hydrogen atoms because of the welding arc. When free hydrogen atoms get into the body, if the heat-affected zone becomes brittle (martensitic structure), hydrogen atoms combine to form H2 in the heat-affected zone. The formation of hydrogen gas comes with the volume expansion and leads to crackings in the heat-affected zone. These can be prevented by the utilization of preheating, where surface dirt is removed with the help of preheating flame.
Hot cracks are also observed in the weld body because of the impurities or inclusions. When fusion takes place, sulfur and phosphorous type inclusions combine with the iron in the body. The combination results in compound formation (generally, iron sulfide is the most problematic one). When solidification initiates, iron sulfide in the body remains in liquid form because of its lower melting point. The remaining liquid in the body leads to residual stress and can be detrimental for welded steel since the residual stresses lead to crackings. Utilization of a filler metal with a high amount of manganese, lower sulfide, and phosphorous can prevent the formation of hot cracks. Also, low heat input in the arc can hinder the possible hot cracks in the welded body.
References
- Davis, J. (2006). Corrosion of weldments. Materials Park, OH: ASM International.
- Yurioka, N. (2001). Advances in Physical Metallurgy and Processing of Steels. Physical Metallurgy of Steel Weldability. ISIJ International, 41(6), 566-570. doi: 10.2355/isijinternational.41.566
- Mohandas, T., Madhusudan Reddy, G., & Satish Kumar, B. (1999). Heat-affected zone softening in high-strength low-alloy steels. Journal of Materials Processing Technology, 88(1-3), 284–294. doi:10.1016/s0924-0136(98)00404-x
- ARMIJO, J. S. (1968). Intergranular Corrosion of Nonsensitized Austenitic Stainless Steels. CORROSION, 24(1), 24–30. doi:10.5006/0010-9312-24.1.24
- Jones, D. (1992). Principles and prevention of corrosion. New York: Macmillan.

